Showing posts with label Tutorial. Show all posts

Saturday, January 4, 2014

Happy New Year!


Happy New Year indeed!  2013 was filled with unexpected surprises, some welcome, and some not so much so.  After a busy summer coming up to speed with my husband's business, we were hit with a historic flood in September.  Our neighborhood backs up to a creek that became a roaring river that spread beyond it's banks threefold.  We helped evacuate our neighbors across the street as the river washed away their acreage and engulfed their home.  Luckily, the house remains standing and the owner, who is a builder, has been working feverishly to rebuild his land and home.

This fall we also helped out daughter apply and get accepted to three universities, but we're still waiting on my Alma mater - CU! I would love her to join the ranks of forever Buffs!!

Our neighborhood welcomed a new baby this year! This is a third child for my lovely, little German neighbor and her husband, and their first girl!  I luckily got to spend some of my winter break knitting for her, NOT in pink, when not skiing.

I'm counting my blessings as I count my stitches.  I hope you can as well.

Here's the Stay On Booties Instructions for the little wee ones in your lives:

Yarn: I used up leftover sock weight yarn
Needles: size 3 double points

CO 9 stitches
K in st st for 32 rows, or 16 ridges
Now you should have a little rectangle swatch of knitting.
Pick up 16 stitches along the longer sides, and 9 stitches on the shorter side. 50 stitches in total on your needles.
Join together by Purling 4 rounds, Knit 4 rounds, Purl 4 rounds, Knit 4 rounds, Purl 4 rounds.
You should have a little basket shape, where the little foot will go!

Now to shape the top of the foot:
From the 9 stitch end, Knit and Purl ROWS back and forth, knitting or purling the last stitch (depending on the row you are on) from the 9 stitch needle with the first stitch from the next needle, decreasing as you go. This creates the top of the booty.  Keep going until you have 32 stitches left on the needles. This will be the ankle.

Ankle:
Knit 3 rounds. On the fourth round create the eyelets for the ribbon or Icord:
Knit 2, YO, K2TOG all way around.
Now knit 22 more rounds then BO.

Sew in ends. You can use a ribbon or knit an I cord for the tie.

Here's a link for the Baby Hat as well, so quick and fun!

Hope you stay cozy!!

Saturday, March 17, 2012

Hala for my Mala!

This is an out of synch post.  This was posted as a seperate page (tab) back in February, and somehow it just didn't seem to fit in there :(  So, now it's back in the mish mash of my blog postings.  At least it's out there, enjoy!

Forget the dishes, here's how:


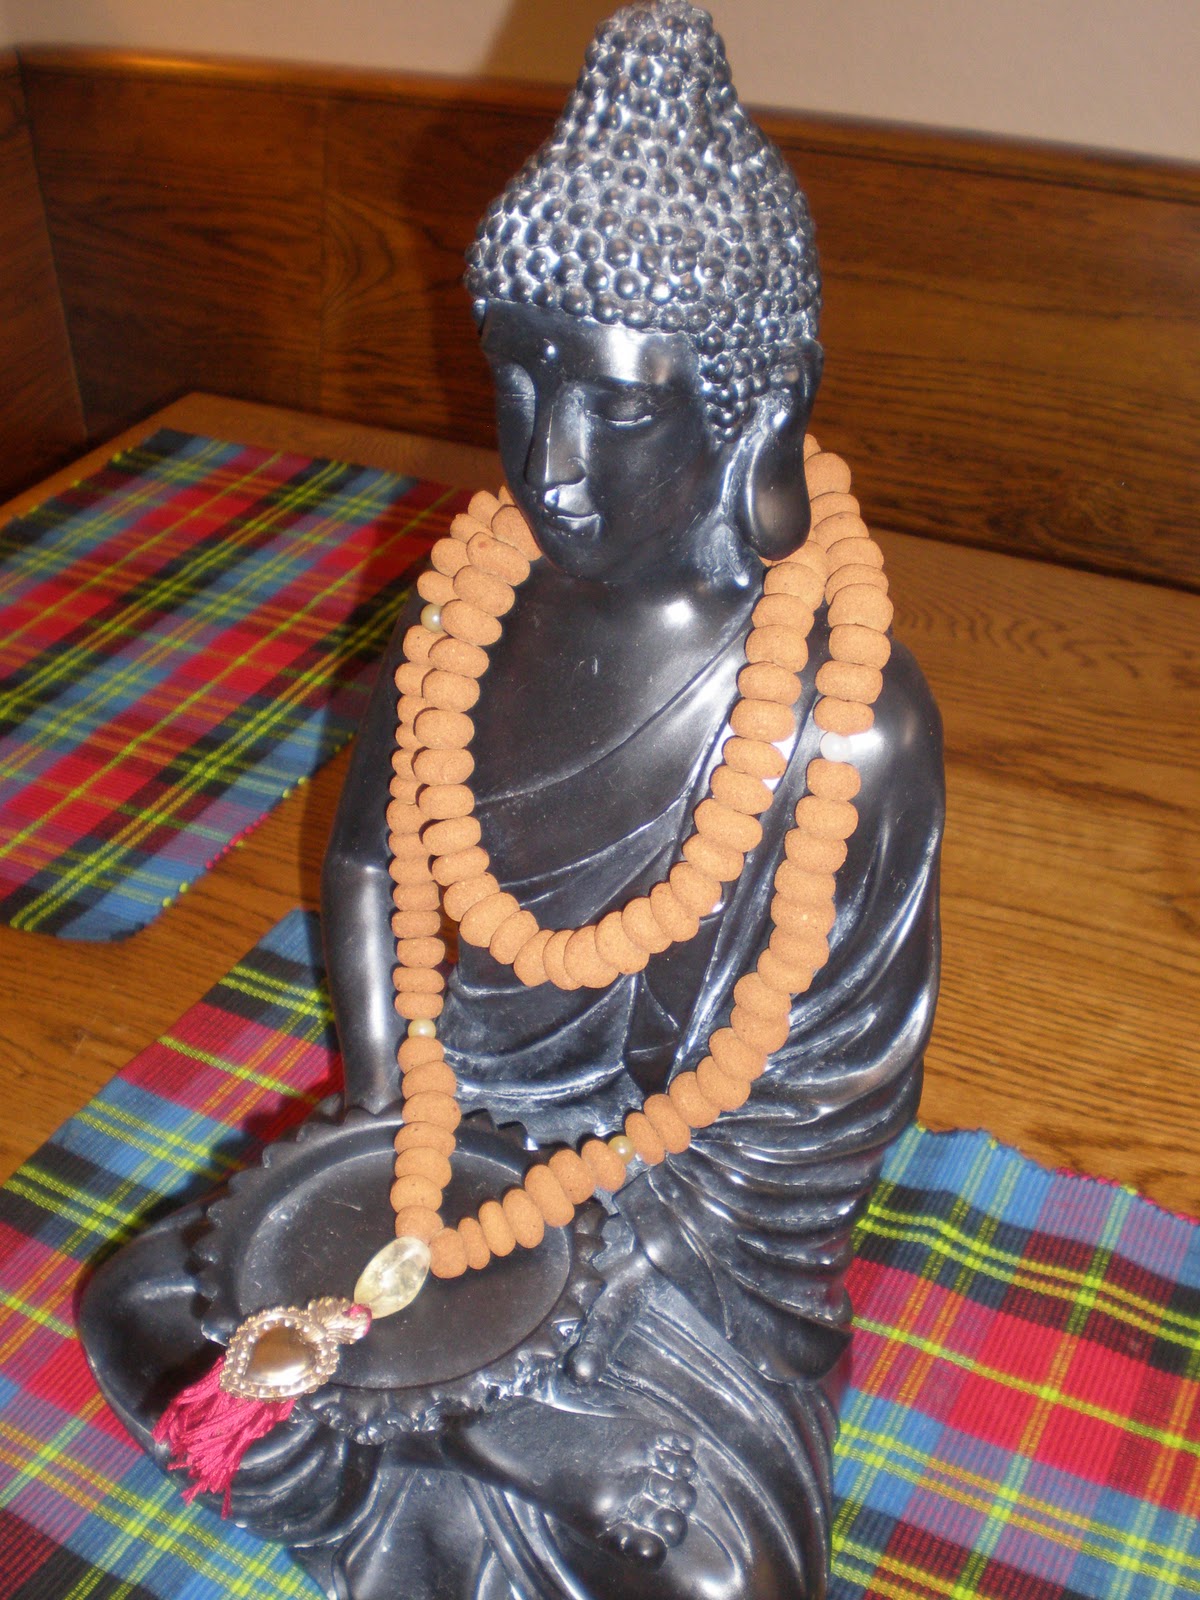
Hi there! Since you're here you're probably interested in stringing a mala, and why not get creative with what you're stringing? I loved making these beads. Warming the cinnamon dough in my hands was a lot like warming up for Kundalini Yoga, and opening the Nadis. The scent of cinnamon lingered on my palms long after making the beads as well!

Here's how to get started:

Stir together the dry ingredients
1 cup powered cinnamon
1 tbsp. allspice
2 tbsp. cloves
1 tbsp. nutmeg

Now mix in the wet
1 c. applesauce (for pliability)
2 tbsp. elmers glue (for firmness)


Mix until you've formed a nice ball of sweetly scented dough. This recipe made enough for a mala, plus extra. I figure I'll roll up the extra and stash away for another day.

Pinch off a bit and roll in your palms until you have a nice, little round bead.


Pierce with a small wooden dowl, chopstick, embroidery needle . . . you get the idea. Lay on a baking sheet in an open, airy place to dry overnight. You might want to flatten your beads a bit by pressing down on them. This helps to keep them from rolling around. You'll need 108 cinnamon beads to string your mala. Depending on what style you choose, you'll need 3-4 marker beads.


Now don't just forget about your little darlings. Check back on them periodically flipping them allowing both sides to dry evenly. Your dough will shrink as it dries so it's a good idea poke the holes one more time to keep them open.

Now you get to choose which style mala you want to string. I used this diagram and chose the Zen Mantra Style, just because. I used some crochet thread I had laying about, and used carnelian spacer (marker) beads. I used a lovely citrine bead for my guru bead. You can use whatever holds meaning for you, or just because you like how it looks and feels. I didn't get too fancy with how I strung the beads, just went for it. I figured the most important step would come when I charged the mala.

I used this tutorial for making the tassel. There are loads of how-to's out there (God bless the Web), so have fun. Investigate, explore. Use whatever technique lends meaning to your creative process.

Blessings!

Friday, August 19, 2011

Hats Off To You!

I have a day off from work today, so I thought I'd get this hat off in the mail for a friend's Mom who is undergoing Chemo.  Cancer is a bitch.  We all have our stories of loved ones and friend's loved ones who have battled, some surviving and some not.


Therefore, I feel compelled to help in anyway I can with another's journey.  This is a great little crochet project.  I enjoyed it so much last winter, especially with this yarn.  I think it will feel just right as a "chemo cap," warm, but not too much so, and SOFT.  I know my girlfriend had a hard time with itching, so hopefully this yarn will do the trick.

Here's the pattern:

Materials
Worsted Weight Yarn
Crochet Hook - G/6 4.255 mm hook

Ch 4 Join in round with sl st.
Rnd 1: Ch 3, 15 dc in ring (16 dc)
Rnd 2: Ch 3, dc in same st, 2 dc in each dc around (32 dc)
Rnd 3: Ch 3, dc in same st, * (dc in 3 dc, 2dc in next dc) repeat from * around ending dc in 3 dc, sl st to beginning (40 dc)
Rnd 4: Ch 3, dc in same st, * (dc in 4 dc, 2dc in next dc) repeat from * around ending dc in 4 dc, sl st to beginning (48 dc)
Rnd 5: Ch 3, dc in same st, * (dc in 5 dc, 2dc in next dc) repeat from * around ending dc in 5 dc, sl st to beginning (56 dc)
Rnd 6: Ch 3, dc in same st, * (dc in 6 dc, 2dc in next dc) repeat from * around ending dc in 6 dc, sl st to beginning (64 dc)
Rnd 7-11: ch 2, skip one dc *(2 dc in next dc twice, skip 2 dc) repeat from * ending with sl st in top of first dc.
Rnd 12-16: ch 1, sc in each dc(sc) around.

Here's the pattern for the Festive Flower (same materials as used in hat):

Ch 5, sl st into a ring
sc 15 into the ring
*Ch 4 work 2 tr into next 2 sc, Ch 4 sl st into next sc
Repeat from * until complete

Counting my blessings as I count my stitches!

Tuesday, July 12, 2011

Crocheting By The Pool

I hope you all enjoyed a great weekend.  I know we did!  We got to enjoy the kids' swim meet with beautiful (albeit HOT) weather and smiling faces.
 
Max and Rachel - Go Cuddas!

I love watching them move from the nervousness before their heats, to great relief and surprise at how well they swam.  And, there is plenty of time between heats to get up to some crafty business.  This day presented the perfect opportunity to launch a project I've had in mind for some time: Crocheted Rag Rug.  I've been holding onto our sheets from when Brad and I first got married because I loved them so much and I couldn't bear to part with them.  Luckily, with this project I don't have to!


Instead, I'll rip them into 1 1/2" strips, wind them into balls, and with my size P crochet hook get going!

Other poolside goodies in my basket: sunblock and lipgloss, of course!

There are lots of alternatives out there on the Web, but I wanted an Oval shaped rug.  So I started by Ch 10.  Then I SC into the front of each loop going down one side.  When I got to the end I crocheted 3 SC.  SC back up the other side, and 3 SC at the opposite end.  Then you simply continue in this manner until you notice the rug starting to curl in.  Whenever you notice this all you have to do is throw in some extra SC at the ends.  Just make sure whatever you do at one end you repeat at the other.  Soon you may end up with something like this:

Pepper modeling the Crocheted Rag Rug
A fellow swim parent asked a very good question, "How many sheets will you need?"  And to that I had to reply, "I'm not sure, I guess I'll just crochet along until I'm satisfied."  I'm thinking it will only take the 2 or 3 sheets that I have on hand (funny that), but who knows?  Perhaps I'll be so inspired I'll be scrounging around for some more!

When all is said and done, there is the question of what to do with the tails sticking out the back.  I'm inclined to weave them in a bit and call it good.  Another poolside suggestion was to Scotchguard the rug upon completion.

One thing I do know, I love taking something whose purpose no longer fits and changing things up enough to give it new life.

What about you?

Thursday, June 2, 2011

Gotta Get Your Head In The Game

Who doesn't love American's favorite pastime, Baseball?  Well, I haven't been so sure, even after living with arguably one of the game's biggest fans for the past 20 years.  What can I say, my brain just isn't wired to follow the plays, or so I thought.  Turns out this season was going to be different.  My son has played Little League for years, but this was the first time with his dad coaching the team.  So it would seem there was no better time to get my head in the game.

Luckily, we discovered a lovely little thing called a scorecard.  Turns out I have quite a penchant for keeping score.  It's a lot like Sudoku, or a cross word puzzle.  I love it!  Finally a way to help me focus on the plays.
Now if they only made one for managing teens.  This past weekend we had the misfortune of finding out what happens when you "take your eye off the ball."  Let me tell you folks, the risks are too great and the consequences scarey.  Raising teens is a slippery slope, kinda' like nailing jello to a tree, but nothing could be more important than establishing those ground rules.  It's tough.  Sometimes it feels a little like "Who's on first?"

"Where are you going?"  "Who's going to be there?"  "How are you getting there?" But we love our kids, and the game, and nothing could be more important.

And if you're going to get your head in the game, why not do it sporting a little "Granny Chic?" 

Click here for this Crochet Headband Tutorial.  I hope you all enjoy, and "Play Ball!"

Saturday, May 21, 2011

Mommy Chicken Prayer Flags

I have long admired the Tibetan Prayer Flags that homes around Boulder County dispaly, and although I do my best to practice mindfulness everyday, I just don't know all the Tibetan chants.  That's why when I was thinking of sewing a Bunting for my niece's graduation, I thought of Mommy Chicken Prayer Flags.  It's kind of a mish-mash of the two.  I would be making a Bunting, but not just with any old fabric purchased for this reason.  I was going to used leftover scraps from the bags, skirts, tops, and even a dress that I had made for loved ones, including my niece.  With this in mind, I would be sewing my prayers and love into each and every one.  Here's how!

I measured and found the smallest scrap that I would be working with.
Now I could come up with a template that would fit all the fabrics.  I used poster board to cut a triangle.
Then used said triangle and pencil to trace the "penants" on the wrong side of each fabric.
Before cutting, I starched and ironed each fabric. This made for easier cutting, and made the flags look a bit more proud! I used pinking shears so I wouldn't have to hassle with a hem or unravelling.
Now it was time to "do the shuffle!"  I moved the flags around and around until my eye, and my daughter Rachel's, liked what they saw.

The final step.  I used single-fold biasis tape in a pretty coordinating color to sew the flags on.  I started by unfolding, ironing flat, then refolding and ironing in half.  I'm sure there has got to be a better way, but I'm known to sometimes "take the long road."  Don't forget, slow and steady wins the race.  But I digress.  You could use a pretty ribbon, twine, whatever you have on hand or whatever fancies your heart.
I carefully spaced out the flags and pinned them in place.  Now that all the detail was taken care of, it was time for the fun part.  Zoom!  With foot to the pedal the Prayer Flags were created.
And hung with much back and forth of the ladder.  Bless my dear sister for putting up with me during this process.  But what can I say, we Mommy Chickens tend to be a bit fussy!

I hope you enjoyed this tutorial, and I more than hope you will make and enjoy your own.

Paper Garlands - For the Graduate!

I've been a big admirer of paper garlands, and my niece's graduation party was the perfect reason to give this craft a spin.  Of course, I wanted to add Mommy Chicken's touch, so I thought why not use some of her old term papers to make the decor that much more personal?  Here's how!

Beg and plead your student to take his/her precious time away from their studies to root through their junk and retrieve and deliver some old exams (not an easy task, I'm sure my niece was shaking her head thinking "what is my crazy Aunt up to now?").

Brew up some strong, black tea.  I used 4 standard size Lipton bags for a quart of water. Here's a thought, if you use a stronger tea you could cut down on the soak time.
Soak paper for as long as 1/2 hour. 
Lay out to dry.  I laid my paper in the rock garden in the shade.  I used rocks conveniently located to weigh down the pages so they wouldn't blow away.  I even think the warmth from the rocks helped speed the drying process.
Now you're ready to start punching.  I bought one of Martha's Paper Stamps awhile back, on sale, just for this occassion.  I've always gone the cheaper route, but let me tell you, the price is worth it.  This is one powerful punch. 
I also used some pretty tissue paper to add a bit of color.
Before I knew it, I had a slew of paper circles to work with.  From here, I fed them into my sewing machine along with wax paper.  The wax paper helped give it the right weight, and helped prevent any tangling (sorry no photo for this, no one was around to take one!)  Just before using, I stripped off the wax paper. 
 
I love this craft and have plans to use it in the future.  I hope you find a great reason to use this craft as well!

Monday, February 14, 2011

Happy Valentines Day!

I'm celebrating Valentines Day by cooking a, hopefully, favorite meal for my husband and children (not so much?).  Pulled Pork Bar-B-Q sandwiches, homemade coleslaw, sweet and sour beans, and vanilla strawberry cake with ice cream for desert. 

ALSO, I wanted to offer this little Valentine's Keepsake Tutorial for you friends in blogland.

Start by crocheting a heart.  I used natural hemp cord because I thought it's earthiness made a good juxtaposition to the heart's frilliness.
Using a size H/8 5.00mm hook
  • Chain 2.
  • Row 1: 2 single crochet (sc) in first chain. Chain 1, turn.
  • Row 2: 2 sc in first stitch, 1 sc in next stitch. Chain 1, turn.
  • Rows 3 to 6: 2 sc in first stitch, 1 sc in each remaining stitch. Chain 1, turn.
  • After row 6, you will have 7 stitches.
  • Row 7: Skip first stitch. In second stitch: 1 half double crochet, three double crochet, 1 half double crochet. Skip one stitch, slip stitch in next stitch. Skip one stitch. In next stitch: 1 half double crochet, three double crochet, 1 half double crochet. Skip one stitch, slip stitch in next stitch.
I just love this simple heart, but wanted to add a little embelishment.  I do like to layer texture and color!  So I got out my handy dandy Yo Yo maker and scraps of fabric from a bag I sewed for Rachel.
And Voila!  Layers of loveliness!
Just have to add one last little punch of GREEN

from some little GREEN buttons off a favorite shirt that I ripped.  I do love reusing my favorite things (cue Julie Andrews!).

The possibilities are endless. You can adorn this little sweet heart to your choosing.  Here's another idea:

Quite a nice addition to the Valentine's Altar.  I will be bringing these keepsakes to a Valentine's Exchange at our Handwork Circle on Thursday, so perhaps there will be time to embelish some more?  I hope you enjoy a very Happy Heart Day!

Thursday, February 10, 2011

A Clever Little Idea

Good things come in small packages, right?  And the more the merrier, yes?  With that in mind, I look at my workspace and think, gosh, I have bits and bobs, flotsam and jetsam, kibbles and bits ALL OVER!  For the most part I enjoy my melange of color, it's what inspires me you know?  But sometimes, enough is ENOUGH!

The other day when I was Socked In, an opportunity presented itself for me to try out this Clever Little Idea (CLI).  If you're like me, you probably have little mounds of embroidery floss stashed here and there, hither and yon.  If so, why not try this out?  Clever Little Embroidery Spools.  Here is the short, but hopefully sweet tutorial:

Start with an old manilla file folder (does anyone use these anymore?) and trace spools all around.  Next, cut them out.  This step reminded me of cutting out hearts when I was in elementary school, or  even when my kids were!


Then, relish in the winding up of all your happy little blobs of color knowing that they will be at your fingertips at the ready.


Lastly, you can punch holes in the tops in order to string them into a pretty lamp necklace,


or pin them up with min clips and create your own colorful bunting, stash them in a plastic "tackle" box, or even file them away in a binder filled with plastic sleeves meant to hold baseball cards (but who wants to hide their colors anyway?)

"The real things haven't changed. It is still best to be honest and truthful; to make the most of what we have; to be happy with simple pleasures; and have courage when things go wrong."
Laura Ingalls Wilder


Related Posts Plugin for WordPress, Blogger...